
My personal life's journey of self discovery and my undying passion for art and all its possibilities. Follow me as I explore, learn, educate, and live my ultimate dream - teaching art and sharing it with others!
Wednesday, April 25, 2012
Mixed Media Using Tissue Paper
I have always wanted to try doing a mixed media project using tissue paper. It was my first attempt, but I can see how it can be addicting. I already have a ton more ideas in my head waiting to be born on canvas. Here is the results of my first project.
 I put a layer of pouring medium over some of the flowers to make them pop. I also traced them with a black sharpie to define their edges.
Sunday, April 22, 2012
Moose Mixed Media
This was the last week for art this session. Saying goodbye to some fellow students was a little tough, but I know they will eventually be back. Taking a break for a month to enjoy life and take a breather, it will be a nice break, but I know I will be itching to get back into teaching.
I decided to do a mixed media project with the students, it incorporated a little of everything. Our project was a moose in the moonlight.
The students first completed the moose on brown bogus paper. I had templates for them to trace so their moose stayed in proportion with the paper. The first class I taught I allowed them to make their own moose, but for some students it was quite challenging and when they were done their moose was half the size and some even looked like snakes! So, I adapted the lesson for the remaining classes and made it a little easier for them.
An hour is not a long time to complete something, so its very hard to go indepth with certain things. So, by giving them a template for them to trace of the moose, it relieved the pressure of having to teach them a drawing lesson as well. That way, they could focus more on the details of their background and moose.
Once they traced it, the cut it out and added their details. They used a black sharpie to trace it and add the eyes and mouth. They then used chalk pastels to add dimension and shading.
Next we worked on the background. I put on a demonstration on how to create the background and make a gradient of color using the white and blue. They then went to work to create their background and used the back of the brush to make the stars.
The last step was to glue the moose on the top and position it correctly. It was a bit challenging for some believe it or not. Here is just a small, small, fraction of the results. As always, the class finished right up to the second, and just didnt have time to take pics.
Enjoy!


Tuesday, April 10, 2012
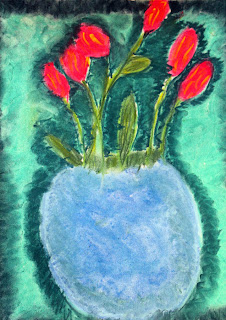
Chalk Pastel Tulips
I do alot of searching...searching for a new and interesting art lesson, searching through magazines for something that catches my eye, searching for a new project that will gets the kids excited.
When I see something I like, I save it to my computer and look through my log of ideas and photos and try to see how I can change it and make it mine. Some of these images I have had for months, and sometimes even years, so I wish I could have given this artist some credit.
I used her idea of tulips and incorporated it into a lesson for the students. I was a little skeptical trying it with them because chalk pastels are very tricky. They smudge alot, and if you are not careful it could end up like a big chalky mess. My little guys in the class can find this challenging, their first instinct is to rest their hand on their paper, so teaching them to hold it upright can be trying.
Anyway, I am over the moon with the results. It was way better than I had expected and I have to give some of my girls recognition. Giovanna, you always make me proud. I love the blues you used in your work. Andrea, I cant stop thinking of how sad I am going to be when you take a break from art this session. This was your best work yet and I am so proud of you for concentrating and making one of the most beautiful pieces of work I have seen from a student in a long time. Bethany, gorgeous. Loved your colors, neatness, and blending. Great job. And my final compliment goes to Caroline! I cant believe that you are in first grade and did such an amazing job. It has made me so happy that you have accomplished such a hard project that is really made for a middle school child. You rock Caroline.


Thursday, April 5, 2012
Zebra Eye Using Watercolor Pencils
We just started this lesson for this week, lots of classes to still teach this to, but I had to post some of the pictures that I have already taken. I was not sure how this lesson was going to go, it its a little tricky. However, I was amazed at their lines and coloring.
This lesson has alot of elements for the students to learn. My objective was to:
The next step was tricky, this is where positive and negative space was introduced! Some kids colored in the wrong space, but we made it work. We used watercolor pencils, similar to colored pencils, except when you add water to it with a paintbrush, the pencil turns into a paint and becomes magical (this is what I tell the kids!)
Here are some of the results:


This lesson has alot of elements for the students to learn. My objective was to:
- Introduce them to watercolor pencils
- Teach them about positive and negative space
- and replicate natural lines that you see in nature and animals
The next step was tricky, this is where positive and negative space was introduced! Some kids colored in the wrong space, but we made it work. We used watercolor pencils, similar to colored pencils, except when you add water to it with a paintbrush, the pencil turns into a paint and becomes magical (this is what I tell the kids!)
Here are some of the results:


Subscribe to:
Posts (Atom)